
Brett Bara, is the host of the PBS television show Knit and Crochet Now, and the former editor-in-chief of Crochet Today magazine. She blogs about knit, crochet, and all kinds of crafty fun at www.brettbara.com. An avid multi-crafter, Brett is also the author of the new book Sewing in a Straight Line.
Below are TWO of Brett’s creations—Crochet Fifi and Crobots.

“I love yarn because it allows me to do so many different creative things…whether it's crocheting or knitting, or even weaving or making pom-poms, yarn is the perfect material for expressing myself and making just about anything. From soft baby blankets and luxurious sweaters to pot holders or amigurumi — yarn allows you to do it all!”
Click on photos to download instructions.
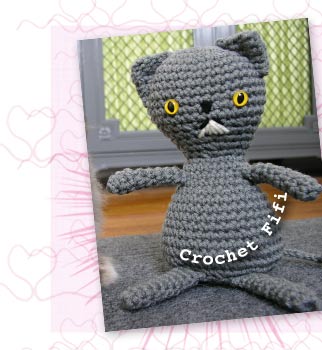
Crochet Fifi
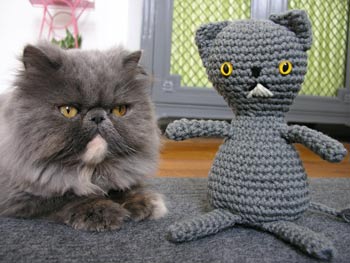 An amigurumi version of my crabby-looking (but very sweet) little cat, Fifi.
By Brett Bara
www.brettbara.com
What You’ll Need
Red Heart With Love:
1 skein Pewter
small amount Black
small amount Aran
Size G(6) crochet hook or size to obtain gauge
2 12mm safety eyes
Yarn needle
Fiberfill
Gauge
Gauge is not crucial for this project; work stitches tightly enough so that the stuffing doesn't show through.
Measurements
Finished cat is 8" (20cm) tall when seated.
Instructions
Ears (make 2)
Row 1: Chain 6. Sc into 2nd chain from hook and each ch across—5 sc.
Rows 2–5: Ch 1, turn; sc into each sc across—5sc. Fasten off.
You will have a small crochet square. Fold the square in half diagonally to form a triangle, and use the yarn tail and a yarn needle to sew the two short sides of the triangle to each other, forming a double-thick triangle that is folded on one side and sewn closed on the other two sides. Set ears aside.
Head
Worked in the round in a continuous spiral.
Round 1: Make an adjustable loop and work 6 sc into the loop. Tighten loop.
Round 2: Work 2 sc into each sc around—12 sc.
Round 3: Work 2 sc into each sc around—24 sc.
Round 4: Work 1 sc into each sc around—24 sc.
Round 5: *1 sc in the next sc; 2 sc in the next sc; repeat from * around—36 sc.
Rounds 6–12: 1 sc in each sc around—36 sc.
Round 13: *1 sc in next 5 sc, sc2tog; repeat from * around—30 sc.
Round 14: Repeat Round 13—24 sc.
Round 15: Work 1 sc in each sc around—24 sc.
Round 16: *1 sc in next 2 sc, sc2tog; repeat from * around—18 sc.
Round 17: *1 sc in next sc, sc2tog; repeat from * around—12 sc.
The crochet will now pause while the face is made and head is stuff. Leave your working yarn attached (secure the last loop on your hook with a stitch marker or safety pin while you work on the face).
Attach the safety eyes between Rounds 10 and 11. With yarn needle and Black yarn, embroider a triangle nose, two slanted lines for a mouth, and eyebrows if desired. With Aran yarn, embroider a triangle chin.
Sew the ears to the head. Stuff head firmly with fiberfill.
Neck and Body
Pick up the working yarn and the loop you left off with, and continue crocheting.
Round 18: 2 sc in each sc around—24 sc.
Rounds 19–21: 1 sc in each sc around—24 sc.
Round 22: *1 sc in next sc, 2 sc in next sc; repeat from * around—36 sc.
Round 23–25: 1 sc in each sc around—36 sc.
Round 26: *1 sc in next 2 sc, 2 sc in next sc; repeat from * around—48 sc.
Round 27: 1 sc in each sc around—48 sc.
Round 28: *1 sc in next 2 sc, sc2tog; repeat from * around—36 sc.
Round 29: 1 sc in each sc around—36 sc.
Round 30: *1 sc in next sc, sc2tog; repeat from * around—24 sc.
Round 31: *1 sc in next sc, sc2tog; repeat from * around—16 sc.
Stuff neck and body firmly with fiberfill before crocheting the final round.
Round 32: Sc2tog around—8 sc. Fasten off and weave yarn through remaining 8 sts; pull to tighten. Weave in end.
Arms and Legs (make 4)
Worked in the round in a continuous spiral.
Round 1: Make an adjustable loop and work 6 sc into the loop. Pull yarn tail to tighten.
Rounds 2–9: Work 1 sc in each sc around—6sc. Fasten off. Use the yarn tail and a yarn needle to sew the open end of each arm/leg to the body. Weave in ends. (Do not stuff the arms and legs; leaving them unstuffed makes them little softer instead of stiff.)
Tail
Ch 18. Fasten off.
Cut approximately six 3" (8cm) lengths of yarn. Weave each piece through the last chain. Wrap another piece of around the whole bunch of yarn pieces, making a tassel-like lion tail. Trim yarn ends to roughly the same length. Sew other end of tail to the body and weave in ends.
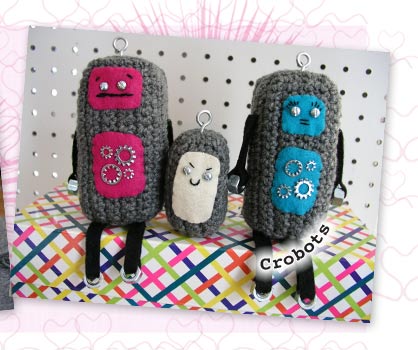
Crobots
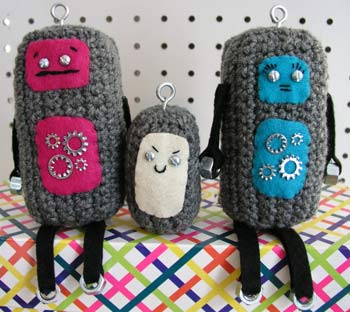 These crobots (crochet robots) are so easy to make, they're a perfect project for beginning crocheters. They're made from simple rectangle pieces and embellished with felt and small hardware to give them tons of charm. The best part? Each one can be completed in just a couple hours, so you can make the whole family in no time. Have fun!
By Brett Bara
www.brettbara.com
What You’ll Need
1 skein worsted-weight yarn
crochet hook in a size to give you a tight gaugecraft felt
miscellaneous small hardware, including screws, hex nuts, little gear thingies, and little loop thingies on screws (just browse the hardware store and find pieces that look interesting)black embroidery floss
sewing needle and thread
fiber-fill stuffing
yarn needle
glue


Gauge
Exact gauge is not important for this project; however, be sure to use a crochet hook that is small enough so that your stitches will be tight and no stuffing will show through the finished pieces.
NOTE: The small metal pieces on these crobots mean these are not safe for little kids, as they could be a choking hazard. Crobots are toys for grown-ups!
1. Make the bodies
photo: front back]
Back
Chain 20. Single crochet in the second chain from the hook and into each chain across.
Row 1: Chain 1, turn, and single crochet into each stitch below.
Work all remaining rows as Row 1, until piece measures 2". Fasten off.
Front
Work as the back, but do not fasten off after work measures 2". Instead, continue working around all four sides of the piece, making one single crochet into each stitch or end of row around each side. Continue working in rounds in a continuous spiral until your sides are 1¼″ deep. Fasten off, leaving a long tail (this will be used later to seam the Front and Back together).
2. Make the face and belly

Cut two pieces of colored felt in square or rectangle shapes with rounded corners. Stitch little gear hardware onto the belly piece, using sewing thread and a sewing needle. For the face, pierce the felt with small scissors or a seam ripper, then insert two screws for eyes. With black embroidery floss, embroider simple straight-line features like a mouth and eyelashes or eyebrows. Remove the screw-eyes for now and set them aside.
3. Make the arms and legs (skip this step if making the baby robot)
Next, cut 2 strips of felt ½″ wide and 4″ long each for the arms, and 2 strips ½ " wide and 5" for the legs. You’ll also need 4 hex nuts.
[photo: sew arm]
Thread one piece of felt through each nut, folding the felt in half so it’s doubled. With matching thread and a sewing needle, sew the two layers of felt together from the nut to the end of the felt. Leave the thread and needle attached.
4. Attach the parts
Sew the face and belly to the front of the robot body, then sew each arm and leg to the body using the same thread you used to sew up the felt arms/legs.
5. Finishing
Finally, sew the back of the body to the front/sides using the long tail and a yarn needle. Stuff the body firmly with fiberfill before completing the seam, then fasten off and weave in the yarn tail.
Insert the screw eyes into the face and a loop-screw thing into the top of each head, placing a dab of glue onto the screw part of each item before inserting it into the fabric/yarn.