
When Linda Cyr was 5 years old, her mother (out of desperation to keep two active children occupied) taught her how to knit. Fast-forward many years. Linda graduated with an engineering degree from Princeton and entered the corporate world. Her managers were not impressed that Linda put down 'Needlework Designer' as a longterm career goal and not 'CEO'.
Following the birth of her second child, Linda gracefully exits the corporate world. After one too many games of CandyLand, she decides that it is time to 'make it happen' and she begins freelance designing for magazines and yarn companies. She’s living the dream!
Hundreds of projects (and even a stint as an 11th hour substitute as the technical expert on a TV series!) later, she still gets excited when an editor calls with an assignment. These days, as CEO of a household of one husband, four kids, and one dog, Linda can be found at swim meets, soccer and lacrosse games - cheering, knitting, and smiling from ear to ear!

“Why do I love yarn? Forget 'Kid in a Candy Store' and think 'Knitter in a Yarn Shop'! Yarn is full of possibilities. It allows me to express my creativity and to feel productive while watching TV. I often get envious comments from other moms while knitting through a swim practice – ‘they wish they could do that.’ I always tell them that they can! Yarn also lets me express love and caring. Handmade gifts are appreciated like no other.
Working as a designer, I love the challenges that the editors toss my way. I will never get called for a masterpiece lace shawl, but if they need a felted costume for a dog (in many sizes!), my phone rings. My husband can't believe that people actually make the things I've designed but I've seen them (thank you, Internet!) and I love that!
But the real reason that I love Yarn is because Yarn never asks 'What's for dinner?', 'Can you give me a ride?', 'Where's my uniform?', or 'Can you drive across town right now, I forgot my cleats?'. That is why, in my house, there is a Yarn Room and it is bigger than the bedroom that my two youngest sons share. (For the record, I do love them, too!)
It may not put food on the table, but I get all the yarn I want!”
Owl Cell Phone Cozy
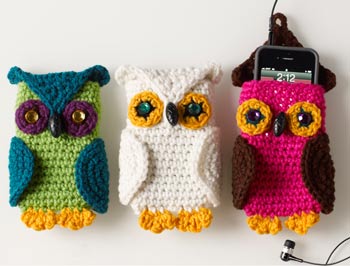 Celebrate I Love Yarn Day with this easy cell phone cozy!
By Linda Cyr
www.redheart.com
www.crochettoday.com
What You’ll Need
-
RED HEART® Super Saver®, Art. E300 available in solid color 7 oz (198 g), 364 yd (333 m); multicolor, heather and print 5 oz (141 g), 244 yd (223 m), flecks 5 oz (141g), 260 yds (238 m) skeins.:
Colorway #1:
40 yds #672 Spring Green A
25 yds #656 Real Teal B
3 yds #321 Gold C
2 yds #365 Coffee D
2 yds each #776 Dark Orchid E
Colorway #2:
40 yds #316 Soft White A
25 yds #316 Soft White B
3 yds #321 Gold C
2 yds #312 Black D
2 yds #321 Gold E
Colorway #3:
40 yds #718 Shocking Pink A
25 yds #776 Dark Orchid B
3 yds #321 Gold C
2 yds #656 Real Teal D
2 yds #321 Gold E
- Susan Bates® Crochet Hook: 6mm [US J-10].
- Tapestry needle
- 1-inch long toggle button for beak
- 12mm round flat-back acrylic crystals: 2
- glue


Finished Measurements
Cozy measures approximately 4½ x 6¼ inches [11⅜ x 15⅞ cm].
Gauge
In pattern 14 sc = 4” (10 cm); 14 rnds = 4” (10 cm). CHECK YOUR GAUGE. Use any size hook to obtain the gauge.
Abbreviations
ch = chain
cm = centimeters
dc = double crochet
dec = decrease
inc = increase
mm = millimeters
sc = single crochet
sl st = slip stitch
st(s) = stitch(es)
yo = yarn over
[ ] = work directions in brackets the number of times specified
* or ** = repeat whatever follows the * or ** as indicated.
Notes: Directions listed for Colorway 1; changes for Colorways 2 and 3 are in ( ).
COZY
Body
With A (A, A), chain 11.
Round 1: 3 sc in 2nd ch from hook, sc in next 8 chs, 3 sc in next ch, working in remaining loops along opposite side of ch, sc in next 8 chs—22 sts.
Round 2: Sc in first sc, 2 sc in next sc, sc in next 10 sc, 2 sc in next sc, sc in next 9 sc—24 sts.
Round 3: Sc in each sc around.
Repeat Round 3 until piece measures 5" from beginning, ending last repeat at side edge. Fasten off.
Head/Flap
Change color to B (B, B).
Row 1: Sc in next 12 sc, leaving remaining sts unworked, ch 1, turn.
Row 2: Skip first st, sc in next 11 sc, ch 1, turn.
Row 3: Skip first st, sc dec in next 2 sc, sc in next 8 sc, ch 1, turn.
Row 4: Skip first st, sc dec in next 2 sc, sc in next 6 sc, ch 1, turn.
Row 5: Skip first st, sc dec in next 2 sc, sc in next 4 sc, ch 1, turn.
Row 6: Skip first st, sc dec in next 2 sc, sc in next 2 sc, ch 1, turn.
Row 7: Skip first st, sc dec in next 2 sc, ch 1, turn.
Working in ends of rows, sl st across to beg of head, turn.
Head/Flap Edging
Working over sl sts in ends of rows, 3 dc in end of first row of Head, sc in end of each row across side of Head (1 sc per row) to top (Row 7), ch 5, sc in side of last sc made, sc in end of each row across opposite side of Head to side of last st of Row 1, (3 dc, sl st) in end of Row 1, fasten off.
Feet
With front facing, holding Body upside down, identify center 8 sts of Round 1.
Foot #1
Insert hook into rightmost st of center 8 sts,
Row 1: Pull up loop of C (C, C), ch 1 to secure, sc in same st as join, sc in next 2 sts, ch 1, turn.
Row 2: *(Dc, sl st) in next st, ch 1; repeat from * once, (dc, sl st) in last st, fasten off.
Foot #2
Skip center 2 sts, insert hook into next st.
Rows 1 & 2: Repeat Rows 1 & 2 of Foot #1.
Eyes
Make 2.
With D (D, D), leaving long tail, wind yarn around finger for beginning ring.
Round 1: Ch 1 in ring, 6 sc in ring, pull tail to close ring, change color to E (E, E).
Round 2: 2 sc in each st around, sl st in first sc, fasten off.
Wing
Make 2.
With B (B, B), leaving long tail, wind yarn around finger for beginning ring.
Round 1: Ch 1 in ring, 6 sc in ring, pull tail to close ring.
Round 2: 2 sc in each st around.
Rounds 3–5: Sc around, inc 6 sc each round. At end of last round, sl st in first sc, fasten off.
Finishing
Fold Head/Flap down, position toggle button opposite loop and sew to Body. Place button through loop. Using photo as a guide, position Eyes on sides of Head/Flap, sew Eyes to Body. Position Wings around Body, sew Wings in place across center of Wing and around back. Glue crystals to centers of Eyes.