
Though she is best known for her crochet books, Margaret has written 22 books in all on both knitting and crocheting and has just started the 23rd! Among her many books are Crochet Lace for Adventurous Crocheters, The Granny Square Book, Learn How to Free Form Crochet, The Complete Photo Guide to Crochet, and The Complete Photo Guide to Knitting. She’s also participated as a contributing designer in many other books and has sold many designs to magazines and yarn companies. Margaret shares: “In addition to the books, I have done two tutorial DVDs on FREE FORM KNITTING AND FREE FORM CROCHET. Free Form is my passion and I designed this little tote to give the crocheter a taste of Free Form. I teach knitting and crocheting workshops all over the country and I have been teaching at my local yarn shop in Pawling, NY for the past 17 years and I still teach there.”

“I love all aspects of both knitting and crocheting, love working with yarn of all kinds. When I am playing with yarn and creating a new free form design I feel just like an artist, painting with my yarn instead of a brush.”
Click on photos to download instructions.
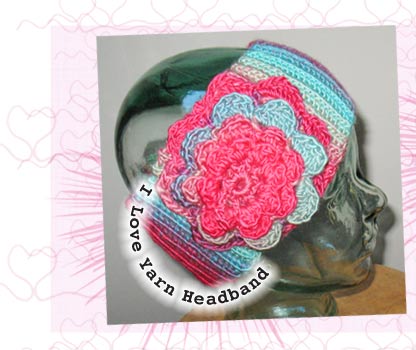
I Love Yarn Headband
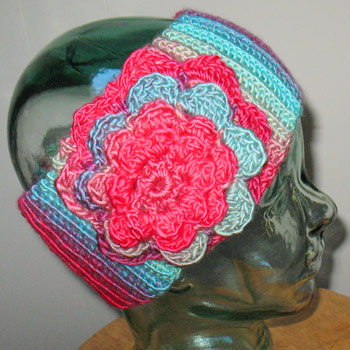 Celebrate I Love Yarn Day with this easy headband!
By Margaret Hubert
margarethubertoriginals.com
What You’ll Need
• Red Heart Boutique, Unforgettable, color Parrot, 1 skein
• Size 4mm/6 or G hook or hook need to obtain gauge
• Yarn needle


Gauge
20 sts = 4 inches
Finished Measurements
22/23 inches X 4 inches
Abbreviations
Beg = begin//beginning
dc = double crochet
ch = chain
ch- = refers to chain or space previously made: e.g., ch-1 space
hdc = half double crochet
rep = repeat
rnd = round
sc = single crochet
sk = skip
sl = slip
sp(s) = space(s)
st(s) = stitch(es)
* Repeat directions following asterisk as many times as indicated.
[ ] = Repeat directions inside brackets as many times as indicated.
( ) = Work directions inside parentheses into stitch indicated.
Headband
Foundation: Chain 21, work 1 sc in each ch (20 sc) turn.
Row 1: Working from the back loop, 1 sc in the first st, 1 sc in each sc across row, turn.
Repeat Row 1 for 84 rows.
Sew short ends together to form a ring.
Flower:
Foundation: Ch 4, join with a sl st to form a ring.
Rnd 1: ch 1, 15 sc in ring, join with a sl st to beg ch 1.
Rnd 2: Ch 4 (counts as a dc, ch-1), sk 1 sc, * 1 dc in next sc, ch 1, sk 1 sc, rep from *
6 times more, end ch 1, sl st in top of beg ch-3 (8 Ch-1) spaces.
Rnd 3: Sl st in first ch-1 sp, [1sc, 1 dc, 1 trc, 1 dc, 1 sc, ch 1] in same sp, work between [ ] in each ch-1 space around, end with a sl st to beg sl st (8 petals with ch-1 space between each.
Rnd 4: Working behind petals, *Ch 4, 1 sc in the ch-1 space between petals, rep from * around, end with a sl st to base of beg ch-4 (8 ch-4 loops).
Rnd 5: Sl st in first ch-4 sp [1 sc, 1 dc, 2 trc, 1 dc, 1 sc, ch-1] in ch-4 loop, rep between [ ] in each loop, end with a sl st to beg sl st (8 petals).
Rnd 6: Working behind petals, *Ch 5, 1 sc in the ch-1 space between petals, rep from * around, end with a sl st to base of beg ch-5 (8 ch-5 loops).
Rnd 7: Sl st in first ch-5 sp [1 sc, 1 dc, 3 trc, 1 dc, 1 sc, ch-1] in ch-5 loop, rep between [ ] in each loop, end with a sl st to beg sl st (8 petals).
Rnd 8: Working behind petals, *Ch 7, 1 sc in the ch-1 space between petals, rep from * around, end with a sl st to base of beg ch-7 (8 ch-7 loops).
Rnd 9: Sl st in first ch-7 sp [1 sc, 1 hdc, 1 dc, 3 trc, 1 dc, 1 hdc, 1 sc,] in ch-7 loop, rep between [ ] in each loop, end with a sl st to beg sl st (8 petals).
Finishing
Sew Flower to headband, starting about 3.5 inches from back seam. Sew outer petals and center, leaving flower dimensional.
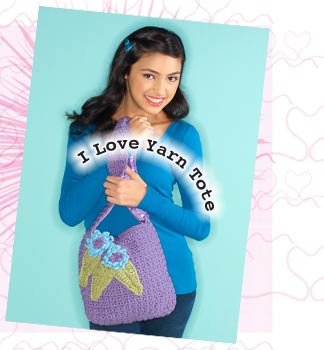
I Love Yarn Day Tote
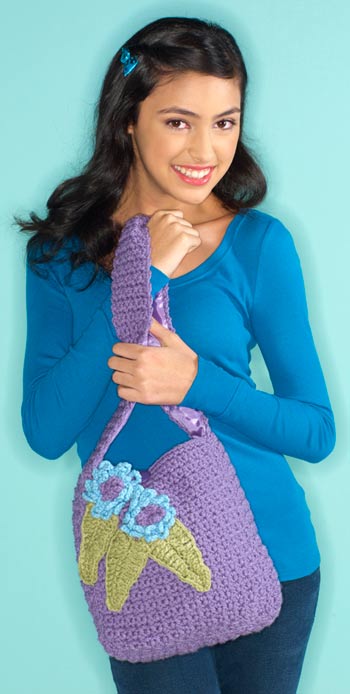 Celebrate I Love Yarn Day with this easy tote!
By Margaret Hubert
margarethubertoriginals.com
What You’ll Need
• RED HEART® With Love™: 1 skein each 1538 Lilac A, 1601 Lettuce B, and 1502 Iced Aqua C. Art. E400 available in solid color 7oz (198g), 370 yd (338m) and multicolor 5oz (141g), 230 yd (211m) skeins.
• Susan Bates® Crochet Hooks: 5mm [US H-8] and 5.5mm [US I-9]
•Three pieces felt, 9" x 12" for interfacing (optional)
•one half yard of silky lining fabric
•one ⅞" button.
Finished Measurements
Tote measures 11" x 12".
Gauge
GAUGE: 14 sts = 4", 13 Rows = 4" with larger hook.
CHECK YOUR GAUGE. Use any size hook to obtain gauge.
Back
With A, ch 33.
Row 1: Sc in 3rd ch from hook, *skip next ch, 2 sc in next ch; repeat from * across to last 2 ch, skip next ch, sc in last ch; turn – 31 sc.
Row 2: Ch 1 (counts as first sc), sc in first sc, *skip next sc, 2 sc in next sc; repeat from * across to last 2 sts, sk next sc, sc in top of beginning ch-1; turn.
Repeat Row 2 until Back measures 10" (25cm).
Next Row Ch 1, sc in each of the next 15 sts, ch 10 (button loop) skip next st, sc in each of the remaining 15 sts. Fasten off.
Front
Repeat as for Back until Front measures 10" (25cm).
Next Row Ch 1, sc in each st across. Fasten off.
Shoulder Strap
With A, ch 11.
Row 1: Sc in 3rd ch from hook, *skip next ch, 2 sc in next ch; repeat from * across to last 2 ch, skip next ch, sc in last ch; turn – 9 sc.
Row 2: Ch 1 (counts as first sc), sc in first sc, *skip next sc, 2 sc in next sc; repeat from * across to last 2 sts, sk next sc, sc in top of beginning ch-1; turn.
Repeat Row 2 until Strap measures 58" (147cm).
Fasten off.
Leaves (Make 3)
Note: Leaves are worked on both sides of the foundation chain.
With B and smaller hook, ch 16.
Row 1: Work 3 tr in 5th ch from hook (counts as 4 tr), tr next 3 chs, dc in next 3 chs, hdc in next 3 chs, sc in next ch, (sc, ch 3, sc) in the last ch (point of leaf); turn to work across opposite side of foundation ch, sc in first ch, hdc in next 3 chs, dc in next 3 chs, tr in next 3 chs, 3 tr in the last ch, ch 3; join with slip st to beginning ch.
Fasten off, leaving a long tail for sewing.
Chrysanthemums (Make 2)
Flowers are made in the round.
With C and smaller hook, ch 5; join with slip st to form ring.
Round 1: Ch 1, work 10 sc in ring; join with slip st to beginning ch-1—10 sc.
Round 2: Working in front loop only, slip st in first sc, [ch 8, slip st in next sc] 10 times; do not turn—10 ch-8 loops.
Round 3: Working in back loops from Round 1, slip st in first sc, [ch 10, slip st in next sc] 10 times—10 ch-10 loops.
Fasten off, leaving a long tail for sewing.
Chrysanthemum Centers (Make 2)
With B and smaller hook, ch 5; join with slip st to form ring.
Round 1: [Ch 6, slip st in ring] 5 times—5 ch-6 loops.
Fasten off, leaving a long tail for sewing.
FINISHING
Assembly
Prepare lining as follows:
Cut 2 pieces to felt to measure 9" x 10" (23cm x 25cm) each. Cut the remaining piece of felt into five 12" (30.5cm) strips for strap. Pin larger pieces of felt to the inside of the Back and Front. Pin the smaller strips of felt along Shoulder Strap. Sew all felt pieces into place.
Using photo as a guide, sew Chrysanthemums and Leaves into place, anchoring onto felt interfacing. Sew button on Center of Front.
Cut 2 pieces of silky lining fabric to measure 10" X 11" (25cm x 28cm) each (for Back and Front). Cut 1 piece of silky lining fabric to measure 3" X 60" (8cm x 152cm) (for Shoulder Strap). Pin silky lining fabric in place, turning ½" (12mm) under for a finished edge and sew into place.
Sew short ends of Shoulder Strap together; center seam at bottom center of Front of bag with Right Sides facing; pin in place and sew seams.
Repeat for Back.
Weave in all ends.
The information on this instruction sheet is presented in good faith and without warranty. Results are not guaranteed.