Make your home the place where family and friends enjoy the holidays. It's easy! Twisted yarn holiday projects can add warmth and cheer to every corner of your home and make great gifts too.
NOTE: All of the projects use worsted-weight, 4-ply acrylic yarn. Basic twisted cord instructions follow the individual project instructions.
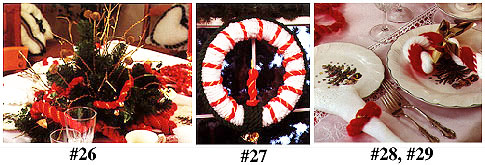
Table Centerpiece, Project #26
Materials:
Yarn -
- Red (or color of your choice),10.5 ozs.
- Gold trim, approximately 15 yds.
A. Cord #1: Make basic cord with 39 loops (78 strands) 135". Run in ends. Double wrap cord with gold trim.
B. Cord #2: Prepare 12 loops (24 strands) 135" long. Make basic cord. Run in ends. Single wrap with gold trim.
C. Weave cords through upper and lower sections of centerpiece as shown.
Window Wreath, Project #27
Materials:
Yarn -
- White yarn, 3.5 ozs.
- Red, 3.5 ozs.
- Green, 3.5 ozs.
- Yellow, approximately 12 yds.
- 12" Styrofoam wreath
- Glue
- 7" of #18 gauge wire
- 3 gold bells (optional)
A. With white yarn make 6 loops (12 strands) 135" long. Twist softly DO NOT double to make cord. Join several lengths. Roll twisted strands into ball.
B. Wrap foam wreath until completely covered; allow strands to kink slightly until wreath has appearance of knobby wood.
C. Secure each end with glue.
D. Make red cord with 12 loops (24 strands) 175" long. Make secondary cord with yellow yarn. Single wrap red cord with yellow. Wind around wreath as shown. Glue ends in place.
E. Make green cord with 20 loops (40 strands) 135" long. Glue to outer edge of wreath. Wind remaining cord around center as show. Tie securely in back.
F. Candle: Make a red cord with 25 loops ( 50 strands) 24" long. Double wrap with yellow cord. With a length of yarn, wrap 6" from end and knot securely. Cut end and form tassel. Insert wire through candle and into foam. Attach 3 bells in cluster as shown.
Napkin Ring, Project #28
Materials: Makes 8
Yarn -
- Red (or color of your choice), 3.5 ozs.
- Gold trim, approximately 10 yds.
For each napkin ring prepare 12 loops (24 strands) 21" long. Make basic cord. Singe wrap with gold trim. Join ends.
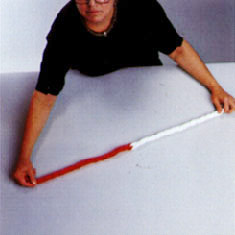
Large Candy Cane, Project #29
Materials: Makes 4, approximately 14"-long candy canes
Yarn -
- White, 7 ozs.
- Red, 7 ozs.
- Four, 12" lengths of #18 gauge wire
- 2 yds. of ribbon, gold
A. With red and white yarn, make 2-color cord with 24 loops (48 strands) 40" long.
B. Make 2-color secondary cord using red and white yarn.
C. Double wrap using 20" lengths of red and white 2-color cord. Insert wire through center of cord and shape as candy can.
D. With 18" ribbon tie a bow at center.
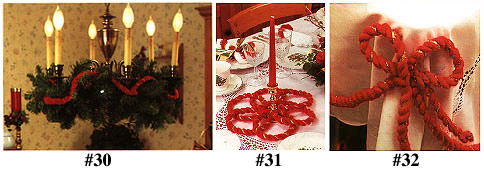
Chandelier Decoration, Project #30
Materials:
Yarn -
- Red, 7 ozs.
- Gold trim, 10 yds.
A. Make cord with 12 loops (24) strands) 175" long. Pull in yarn ends. Double wrap with gold trim. Weave through chandelier as shown.
Candle Centerpiece, Project #31
Materials:
Yarn -
- Red(or color of your choice), 7 ozs.
- Gold trim, approximately 150"
A. With red yarn, make two cords with 12 loops (24 strands) 135" long.
B. Join 2 basic cords to measure approximately 90". Single wrap with gold trim.<
C. Place a marker every 15", thus dividing cord into 6 even sections. Loop each section into a circle and tie with a separate length of yarn; loops should overlap each other slightly, leaving at center an opening you must then adjust to fit varied-sized candles.
Tablecloth Garland, Project #32
Materials: Each cord requires approximately 3.5 oz. of yarn and 10 yards of gold trim. A table size 42" x 61" (pictured) requires 10 cords; one cord every 20".
Yarn -
- Red, 3.5 ozs. per cord
- Gold trim, approximately 10 yds. per cord
A. For each cord prepare 12 loops (24 strands) 175" long. Make 10 basic cords. Pull in yarn ends.
B. Single wrap each cord with gold trim.
C. Push each end of cord through middle of twist, approximately 17" from end to form one half of bow.
D. Pin or stitch to tablecloth. Join second loop close to first to form a bow.
Creating Your Decor--Basic Instructions
Here are step-by-step basic twisted cord techniques. These procedures are used in making the projects of the month.
Basic One-Color Cord
1. Determine Length
- The amount of yarn needed to make a cord is approximately three times the length of the finished twisted yarn. Example: if the finished length is to be 4 yards, 12 yards of yarn will be needed.
- Each project's material list shows the total yards of yarn needed. You will not need to multiply the figure by 3.
2. Twisting the Yarn
By Machine -- There are electric drill-type machines available which help you twist and fold the yarn.
By Hand -- Looping the yarn around a stationary fixed point (such as a door knob) is recommended when working by yourself. Here's how:
a. Each project will list the number of loops needed.
 Example 1: A project requires twisted yarn made out of 1 loop that is 135" long (3 3/4 yds.). To make the one loop (2 strands), you would cut a length of yarn that is 270" long (7 1/2 yds), loop it around the fixed point, (such as a doorknob as illustrated) and tie the ends together.
Example 2: A project calls for six loops that are 135" long. You'll need to make six loops (12 strands) around the fixed point for a total of 45 yards (7 1/2 yds x 6).
Tie the two loose ends together.
Illustration 2a showing 1-loop ends being tied together, 2b showing 6-loop ends being tied.
b. Through the other end of the one or more loop ends, slip a pencil, crochet hook or similar long, narrow object.
c. Pull the length of yarn taut and begin twisting until very firm.
 Illustration 3 showing hook through end and twisting in progress.
d. Keeping the now twisted yarn taut, find the mid-point and fold in half, bringing the opposite ends together. The finished twisted yarn cord will form automatically. Example: If the total length of taut twisted yarn is 2 yards long, the mid-point is at 1 yard. It is at the mid-point where the still-taut yarn will begin twisting onto itself to form the finished twisted cord as you bring the ends together. On short lengths, this step is easy to do.
Illustration 4 showing ends being brought together.
On longer lengths (when working by yourself) you will need to bend the mid-point around an object that allows you to easily slip off the finished cord.

Illustration 5 showing cord's mid-point looped around chair spindle.
Illustration 6a and 6b showing ends being tied.
e. To tie the two ends together, first pull two strands of yarn from one end.
6a. Use a crochet hook to pull one strand through all loops of the other end.
6b. Tie the two strands together.
Joining Lengths of Cord
Illustration 7 showing second cord slipped through end of first.
First complete one length of twisted yarn cord. Make a second cord, but BEFORE folding it in half, slip your completed cord over one end of the second cord. Guide it to the center.

Illustration 8 showing second cord being folded.
NOW fold the second cord in half and let it twist onto itself. Tie end securely. You may join as many lengths as needed until desired length is achieved.
Making Tassels
Illustration 9 showing one knot complete and second being tied.
To form a tassel at the end of a cord, use a separate length of yarn to securely tie a double knot (two knots) 6" from the end. Tie a second double knot 5" from the end.
Illustration 10 showing loops being cut.
Cut loops open, trim evenly.
Attaching Secondary Cords
Illustration 11 showing secondary cord being tied after being pulled through loops of yarn.
To attach a secondary cord, pull it through one or more loops at the end of your primary twisted cord. Tie securely.
Hints
1. To speed up looping whenever many strands are required, use 2 or 3 skeins of yarn at a time.
2. Finished length will vary according to the tightness of the twist.
Two-color Cord and a Candy Cane

1. Make a length of red twisted yarn and a matching length of white twisted yarn. Loop one through the other as shown.
2. Pull taut, twist as shown. Allow the two-color cord to twist onto itself at the center point. Tie ends together.
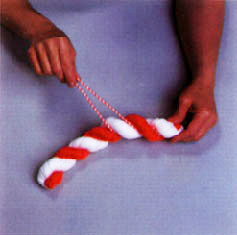
3. Make a two-color secondary twisted yarn cord for trimming. Beginning at top, wrap trim cord in single groove of candy cane.

4. Insert a piece of #18 gauge wire in the "hook" part of the candy cane. This will help the cane keep its shape.
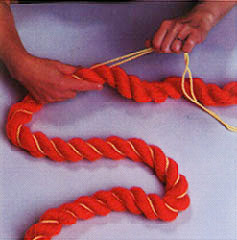
Secondary Cord and Wrapping with Trim
The secondary cord used for trimming is usually made of one loop. Twist the loop tightly and fold in half, allowing it to twist onto itself as with the basic cord. Secure this secondary yarn cord inside the primary yarn cord and follow the groove.
Single Trim: Beginning at top, wrap trim in single groove of main cord. In this photo, gold-colored cord is used as the secondary cord.
 Double Trim: To add a double trim, secure 2 trim cords at one end. Place one at each side of cord. Wrap the trim in each groove.
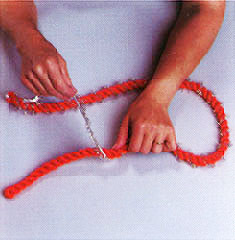
Creating a Chain Effect
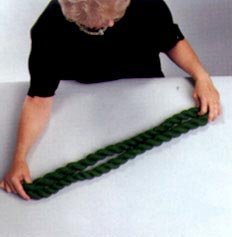 1. Position a length of completed twisted cord in a loop. Hold one end firm and twist the other end.
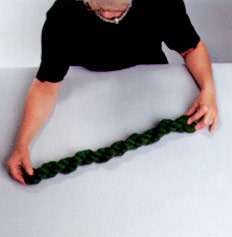 2. Twisting it toward you will create one of the two effect shows.
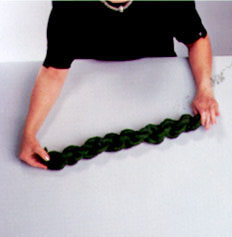 3. To create the other effect, twist in the opposite direction.