Changing yarn colors or starting a new ball or skein of yarn
If you are simply joining a new ball or skein of yarn in the same color, it's best to do it at the beginning of a row because it is easier to hide the tail of the yarn. Simply wrap the new yarn around the hook and draw up a loop and continue crocheting. Leave a 6" long tail of yarn to, tie a loose knot to hold the yarn in place. When you complete your project, untie the knot and weave in the ends. This also applies when you have to change yarn in the middle of a row.
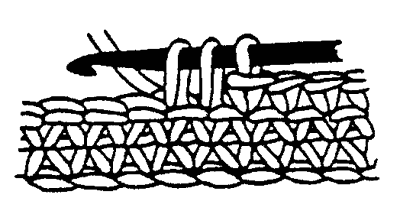
When a pattern says to change colors, it is made this way: Work the last stitch to final two loops on the hook, draw up a loop with the new color and complete the stitch.
If you are following a color chart or crocheting a multicolor pattern, yarn can be carried along the back of the work if the repeat is fairly close together. If yarn is carried more than 3 or 4 stitches, carried yarn should be caught into the work every 2 or 3 stitches.
Crocheting in the round
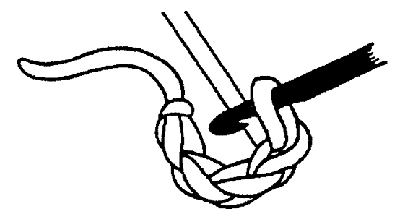
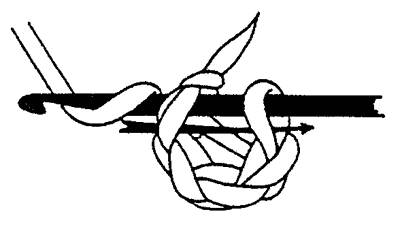
There are two forms of crocheting in rounds. One forms a tube, such as working in rounds to make leg warmers. The second forms a flat circular surface such as a doily or tablemat.
Both start with a foundation chain, which is joined with a slip stitch. To create a tube, work the required stitches into the foundation chain. When the first round is worked, immediately go into the second round. To count rounds, place a marker at the end of the first round.
To create a flat circular surface, make a circle by joining the foundation chain with a slip stitch. The first round of stitches goes directly into the space in the center of the ring. In the next rounds, stitches are worked under the top loops of each stitch in the usual way. To achieve a flat surface, increase stitches according to the pattern instructions.
Decrease
The simplest decrease is to skip a stitch.
The following decreases, which crochet two stitches together, do not leave a hole in the work. In single crochet, insert the hook in the next stitch, yarn over and pull yarn through. Instead of completing the single crochet, insert hook into the next stitch, yarn over and pull through so there are three loops on the hook. Yarn over and pull yarn through all 3 loops to make 1 decrease.
In double crochet, work the first double crochet until only 2 loops are on the hook. Yarn over, insert hook in the next stitch, yarn over and pull through stitch (3 loops on hook). Yarn over and pull through 2 loops, then yarn over and pull yarn through all 3 loops to complete a decrease.
Difficulty pulling hook through loops (Split stitches)
It is easier to pull yarn through loops if the hook is turned slightly down with yarn pulled firmly around the hook. The yarn must be loosened after each stitch is made.
Edge of foundation row puckers
If the foundation row is tight, the crocheted fabric may pucker. A tight foundation row in a hemline and sleeve makes edges that are tight and uncomfortable. To avoid this problem, crochet experts suggest using a larger size hook and then switching to the recommended hook size. Chaining very loosely will also solve the problem.
Extra stitches — where did they come from
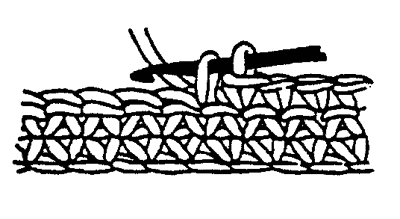
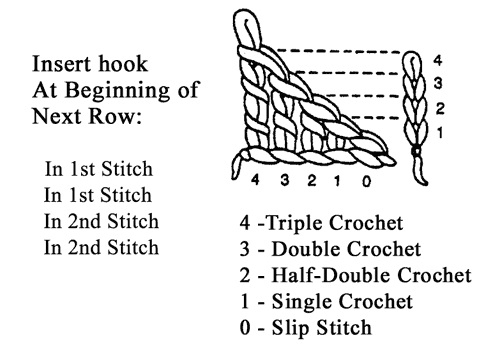
Most errors occur at the beginning and end of a row. Check the directions. For single crochet, work the first stitch in the row in the first stitch of the row below. Work the last stitch in the last stitch of the single crochet in the row below. For double crochet, work the first stitch in the second stitch of the row below. Work the last stitch in the turn chain. At the end of each row count stitches to be sure it is the number required.
Extra stitches can result when two stitches are made in one, which is particularly easy to do with textured yarns because it is harder to see the actual stitch.
Finishing & Blocking
Finishing refers to seaming the garment pieces together (see Joining Seams) and weaving in yarn ends (see below). Blocking the garment evens out stitches, flattens your seams and gives the garment a more professional appearance.
Follow the yarn label for the manufacturer's directions. When a yarn label says to machine wash and dry, it usually means the yarn has "memory," i.e., machine washing and drying will restore the original shape.
Some yarns require different methods of blocking such as wet blocking or steaming. For wet blocking, hand wash or dampen the garment, squeezing out as much moisture as possible by wrapping in a towel or a short machine spin. With the whole garment supported, lay it on a flat surface to dry.
If steaming, keep the iron or steamer at least a half inch above the garment on the wrong side. Lay the garment flat to dry thoroughly, as it can be warped or misshapen when damp.
Increases
To increase, simply make two stitches in one stitch.
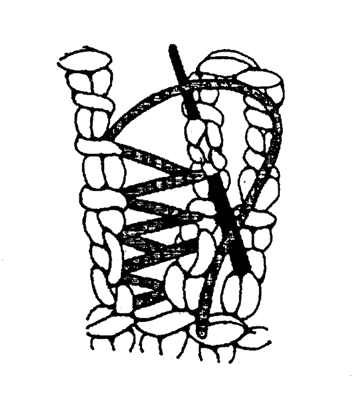
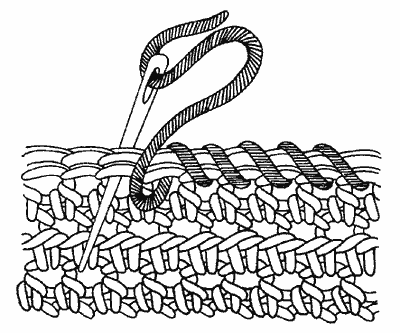
Joining seams (Invisible Weaving, also called Mattress Stitch, Backstitch, Slip Stitch)
 There are several ways to seam in crochet. Regardless of what method you use, be sure not to pull the seaming thread too tight or the seam will pucker. If your project is made with a very textured yarn, which will be difficult to pull through the loops, you might consider using a ooth yarn in a matching color.
The most common method of weaving two seams together is called invisible weaving or mattress stitch, which is also called invisible weaving. Place your project on a flat surface with right sides facing you and with matching yarn. Thread a blunt-point yarn needle. Beginning at the hem edge, secure yarn through both sides. With the needle pointing up, pick up the first stitch, leaving yarn loose; go to the opposite piece and pick up the corresponding row.
Continue working back and forth. Every three or four stitches tighten yarn in seam. Be sure the yarn is tight enough to disappear, but not enough to shorten or pucker the seam.
 Backstitch is another method of seaming but it creates a bulkier seam. Holding the right sides of your project together, thread a blunt-pointed yarn needle with matching yarn. Beginning at the hem edge close to the edge, secure yarn through both sides. Come up through the fabric at point A, make a stitch backwards and come up at point beyond where you made the first stitch. Match backstitch size with crochet stitch size.
 Slip Stitch is another method but it also creates a bulky seam. Make a slip knot at end of the yarn. With right sides together, put hook under both bound off edges, catching the slip knot and pull through both pieces of fabric. Insert hook under the next stitches; pull through all loops on the hook. Continue until seam is complete. This is an excellent stitch for afghan square assembly.
 Overcast is another method, but also creates a bulkier seam. With blunt-pointed needle and matching yarn, place right sides together and insert needle back to front, bringing the needle over the edge. Insert needle back to front again catching only one or two strands from each edge. Continue in this manner.
Missing some stitches — where did they go
If your crocheting keeps getting narrower, it means you are not crocheting into every stitch in a row. Remember, for single crochet, work the first stitch in the row in the first stitch of the row below. Work the last stitch in the last stitch of the single crochet in the row below. For double crochet, work the first stitch in the second stitch of the row below. Work the last stitch in the turn chain. Count stitches frequently.
It is also easy to miss a stitch within a row, especially when using a textured yarn where it is harder to see the actual stitch.
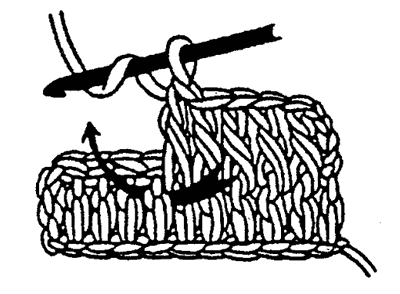
Turning chains — what are they and do they count as a stitch
 Turning chains are the number of chain stitches worked at the end of a row to achieve the required height for the next row.
Uneven edges
Usually crooked edges are the result of adding extra or skipping stitches. Most frequently, this happens at the end of a row, which is why it's helpful to regularly count your stitches.
If you find you have added or subtracted a stitch try to go back and see where you made the mistake. If it's in the row you are crocheting, simply rip back and correct it. If it was made several rows below, then you have to make a choice-rip back to the point, add or subtract a stitch on the current row or if it is not critical to the design of your project, just continue.
Working single crochet around the edge of a finished garment gives a smooth look.
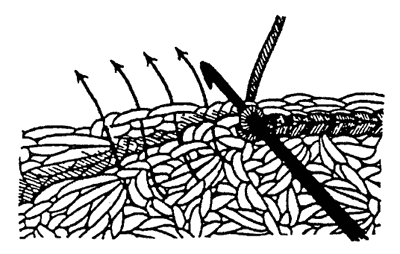
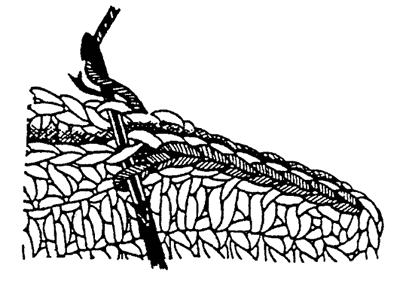
Weaving in Yarn Ends
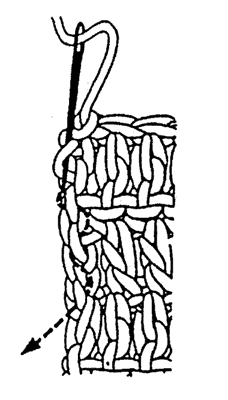 At the completion of a project, weaving in any yarn ends is necessary for neatness and to prolong wear. With the wrong side facing, thread a blunt-pointed needle with the end of the yarn. Carefully weave the needle along the back of the stitches about 2 to 3 inches on a diagonal, gently pulling the yarn end. Weave the other yarn end in the opposite direction. When finished, gently stretch the fabric in all directions so the fabric does not pull. Trim excess yarn ends.
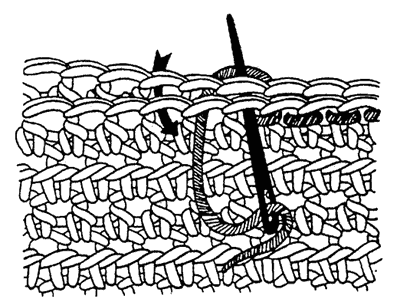
Working Under Front, Back or Both Loop(s)
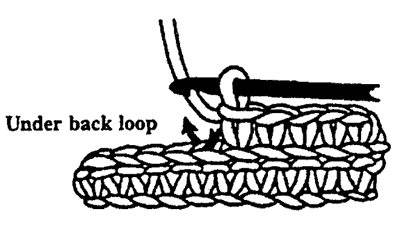 Generally a crochet stitch is made by slipping the hook under the top two loops of a stitch, but some patterns will say to insert the hook through the back or front loop only. This creates a ridge or horizontal bar across the row. See Crochet Abbreviations for working into the front or back loops.
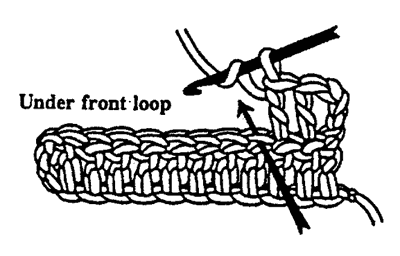
Working around the post
Post refers to the stitch below the row being working. You literally circle the post of the crochet stitch below, either from the front and out again or from the back and out again and then work the stitch as usual. This produces a raised effect.